Setting alerts in SigNoz
Starting with v0.5.0 you can set alerts in SigNoz.
Setting Alert Rules
Alerts in SigNoz are heavily inspired by how Prometheus manages alerts, as we found that as the most flexible way of setting alerts. So, if you have set up alerts in Prometheus, the following should sound very familiar.
Navigate to Alerts page from the left panel. It has 2 tabs:
- Alert Rules
- Triggered Alerts
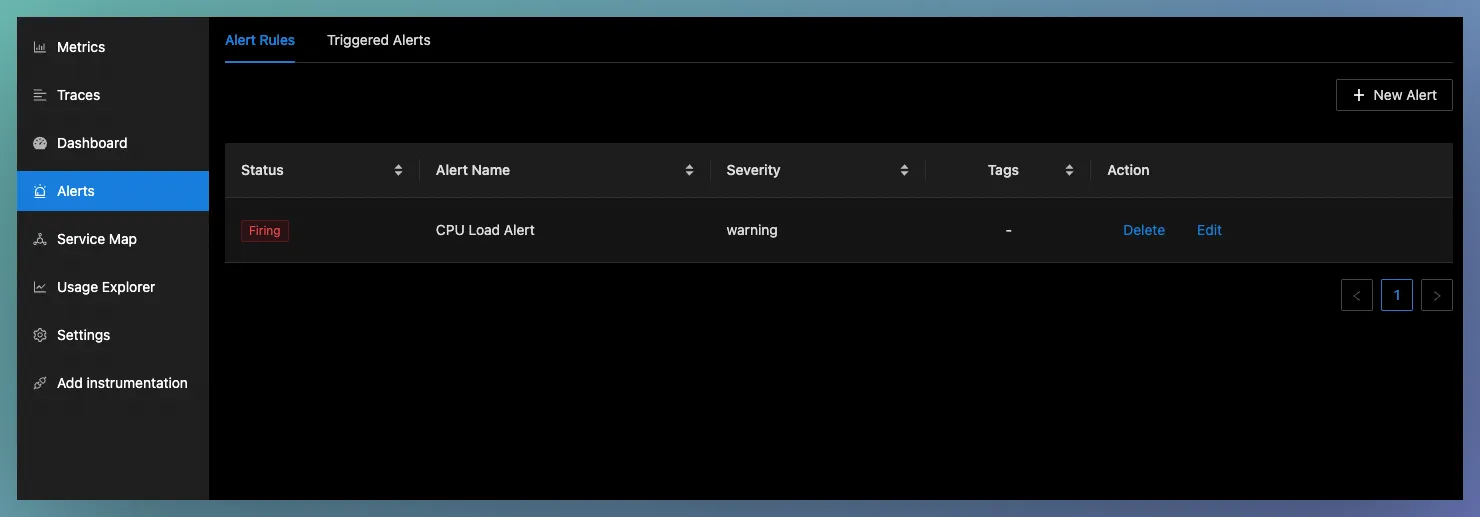
Alert Rules
Alert Rules set the expression you want to evaluate to start firing alerts. The Alert Rules tab shows a list of currently configured alert rules and labels like severity and Alert Name. It also shows the current status of this Alert rules. If any alerts are firing because of this or everything is Ok
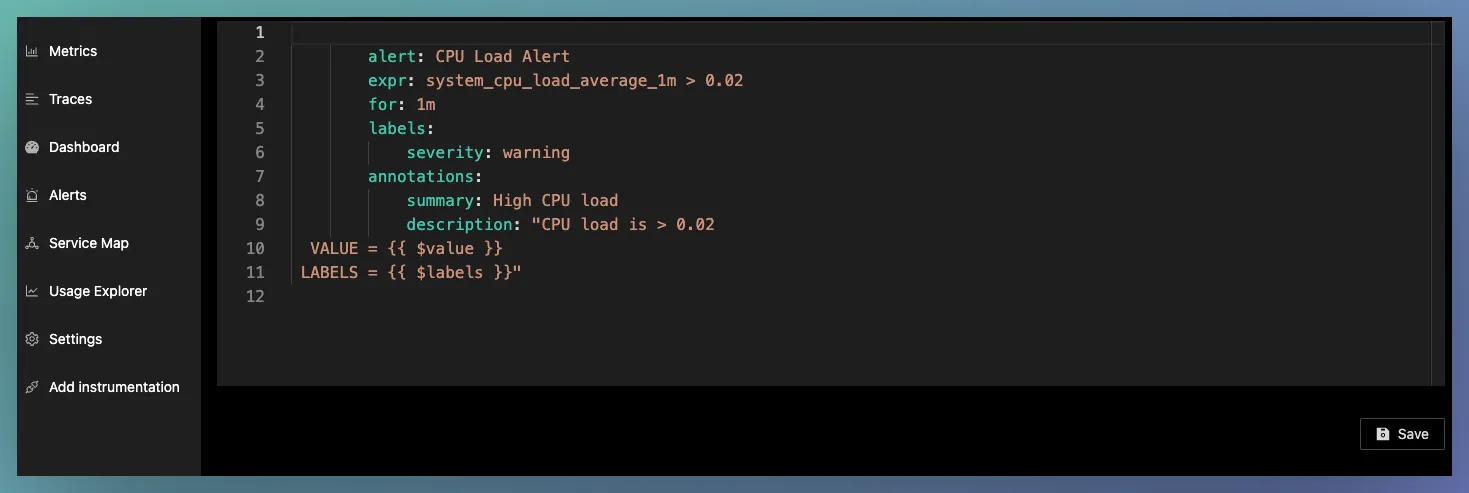
Create Alert Rules
To create new alert rules, you can click the New Alert Rules button. This would open a Prometheus like Alert rule editor for you. If you haven't used Prometheus before, don't worry this is pretty simple.
- Set the expression you want to evaluate to true to trigger alerts
- Set the period for which you want to wait (after the expression is true) to start firing alerts
- Set labels like
severityto communicate how severe the issue is if this alert starts firing
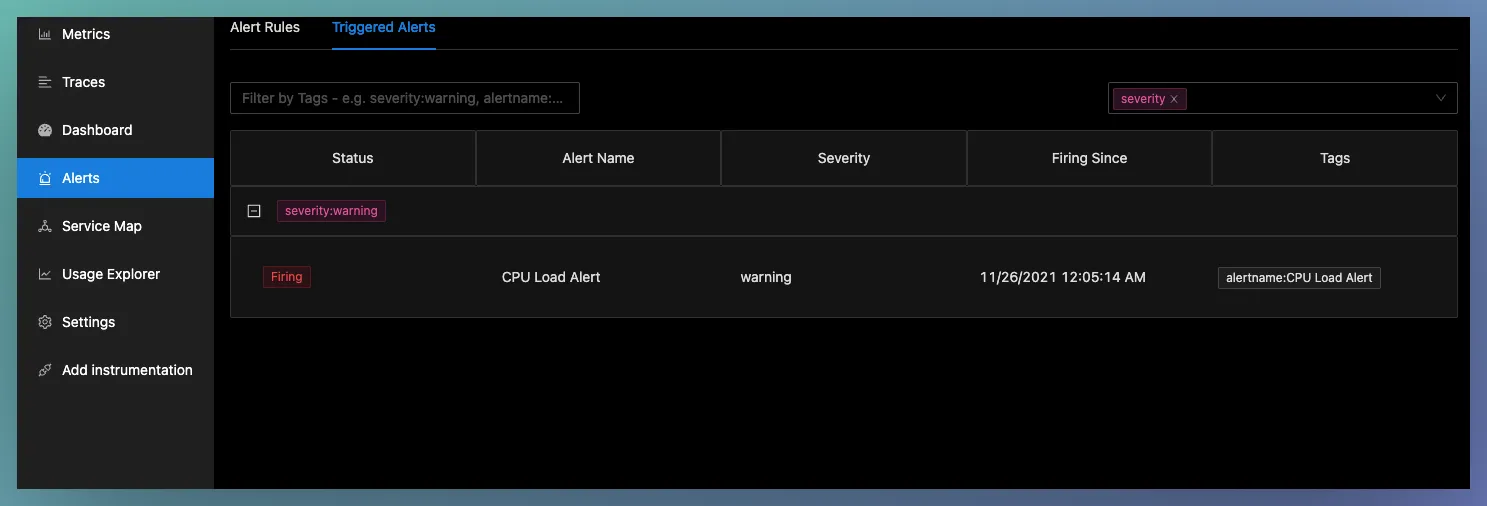
Triggered Alerts
Triggered alerts show the alerts which are in firing or pending state.
Pending means that the rule threshold is crossed, but it is still waiting based on the specified time period. Once the specified time is passed, the alert starts firing.
It also has different tags like alert name, severity, since when the alert started firing, etc.
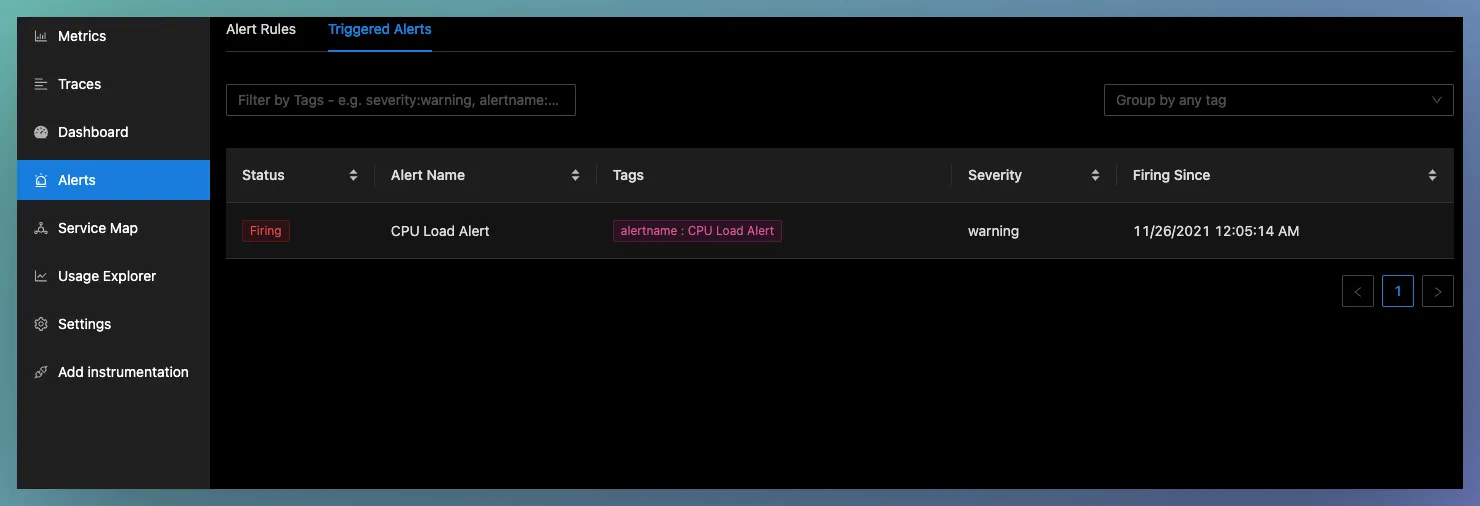
- Filtering and grouping Triggered alerts
You can also filter and group triggered alerts based on tags. The filtering field accepts multiple key-value pairs like serverity:warning
For grouping, you can use any of the tags like severity, alertname or any other label you would have specified in your alert rule. You can use the grouping feature to group the list of triggered alerts based on these tags.
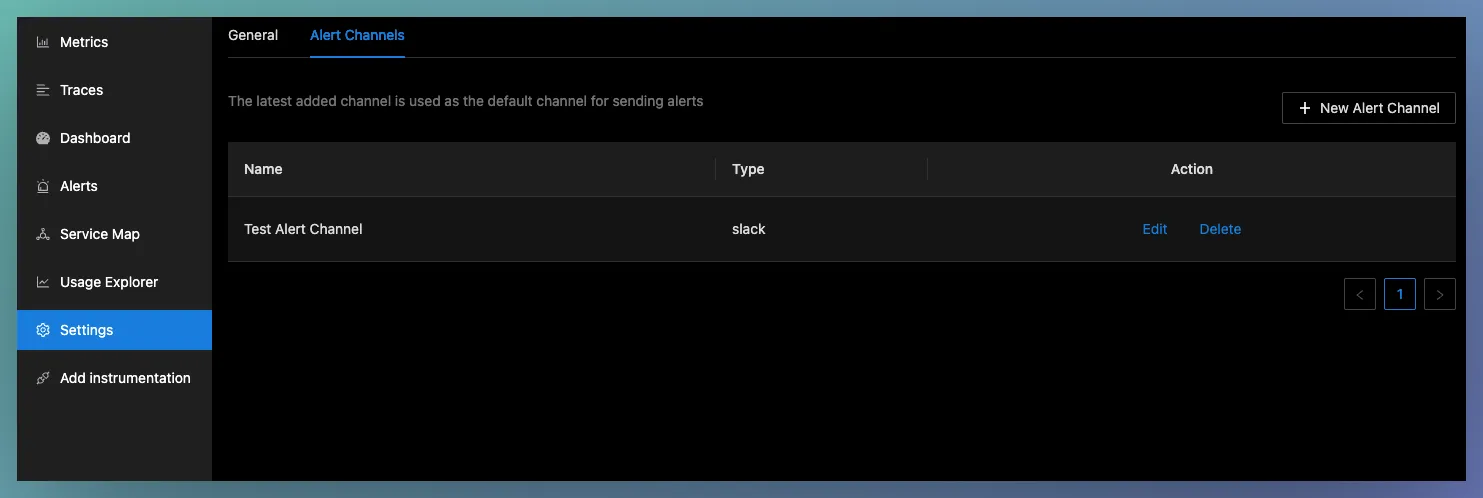
Setting up a Notification channel
You can setup notification channels for sending the generated alerts to other applications. Currently, the following channels are supported:
We are also working towards adding more channels (like OpsGenie, Email) in the upcoming releases.
The alert channel tabs can be accessed from Settings > Alert Channels tab. This shows a list of configured alert channels. When multiple channels are setup, the alerts will be sent to all the configured channels.
Configure Slack Channel
Prerequisite
For setting up Slack as a notification channel, you need to first configure an Incoming Webhook in Slack. The following article explains how to do that - Sending messages to slack using Incoming Webhook
Creating a new Notification channel (Slack)
You have to provide a name, webhook URL and channel name (with # prefix) to configure a notification channel. You may use go templates for the title and description.
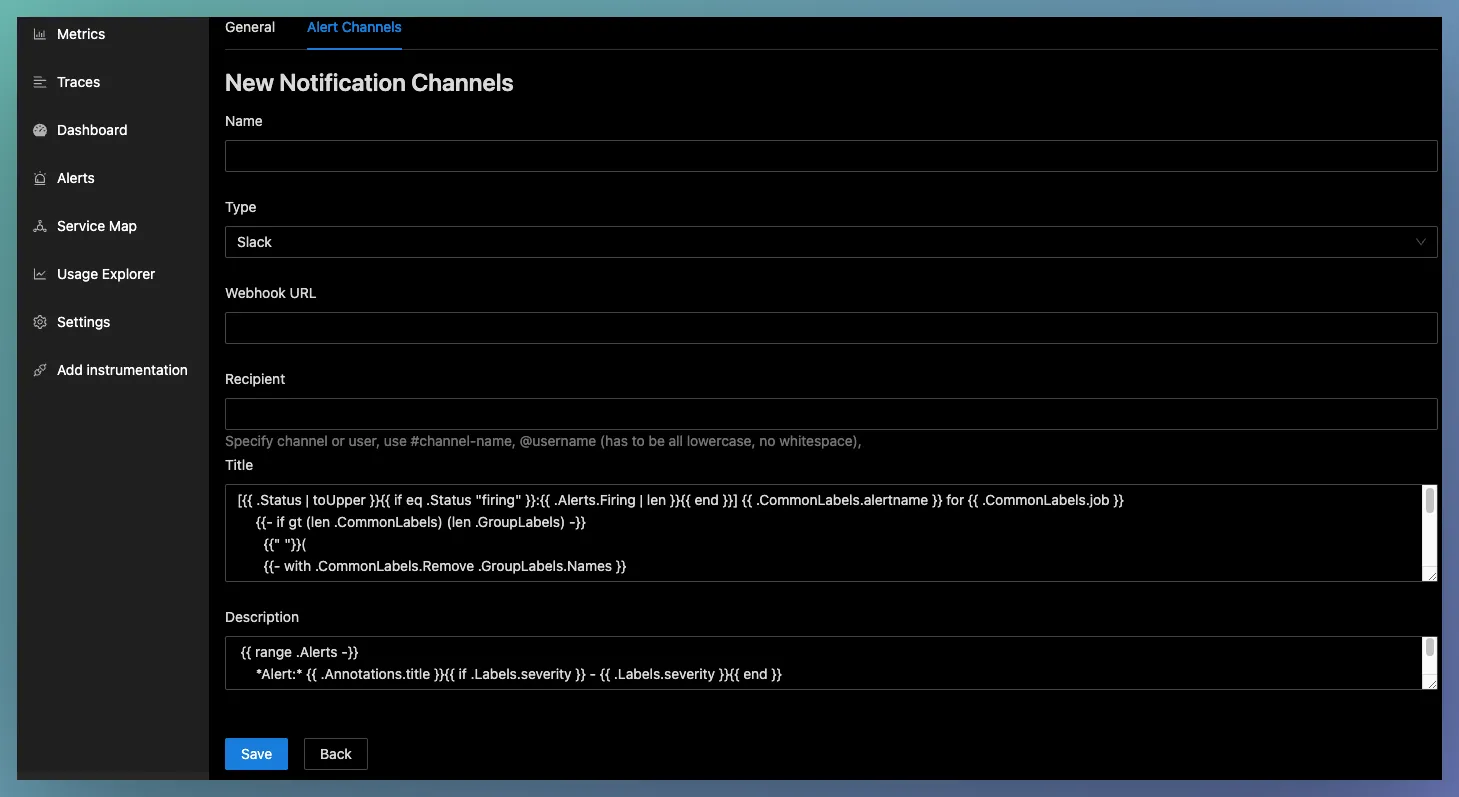
You can also verify the configuration by using the Test button. When you click Test, a test alert will be sent to the configured slack channel. The purpose of this feature is to confirm that signoz alert manager can talk to your webhook URL.
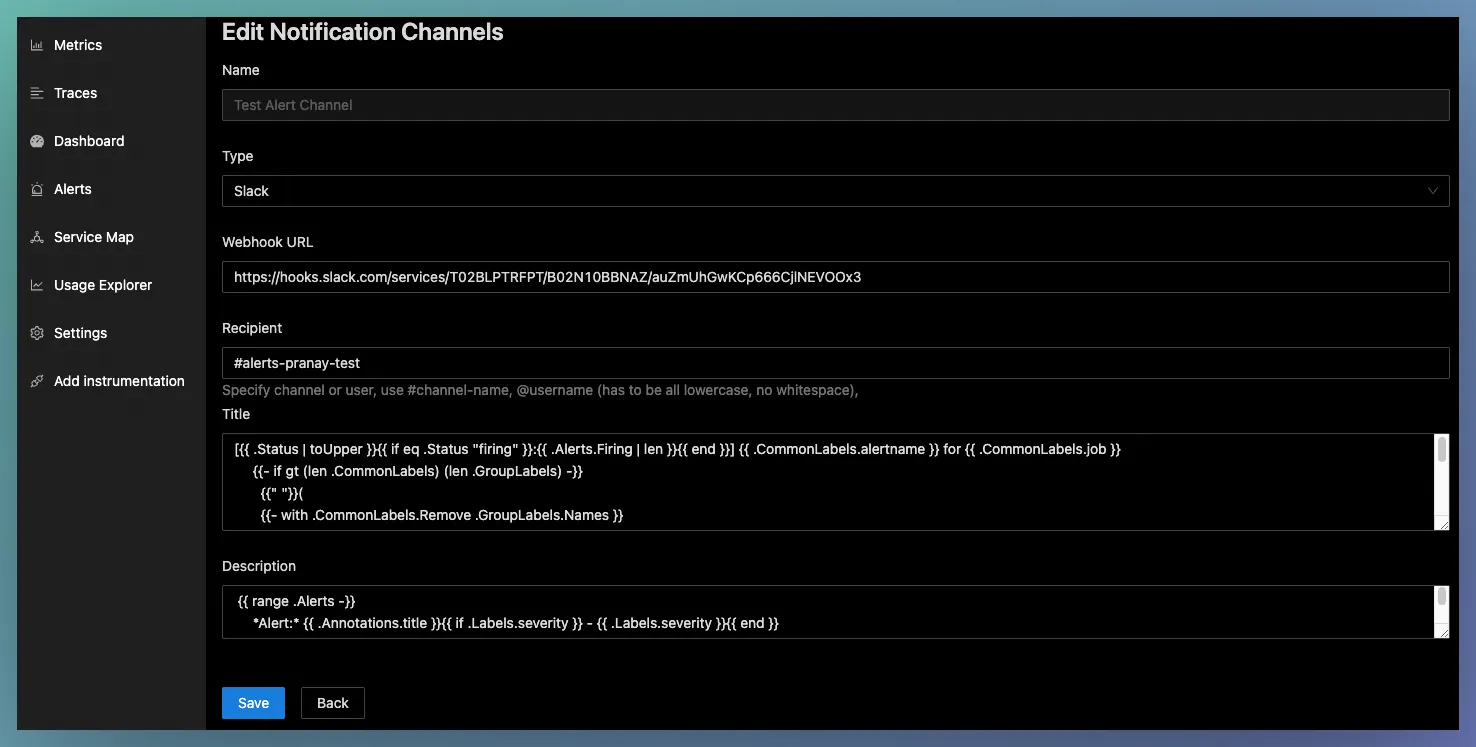
Editing a Notification channel (Slack)
You can edit slack webhook URL or other parameters except the channel name and channel type.
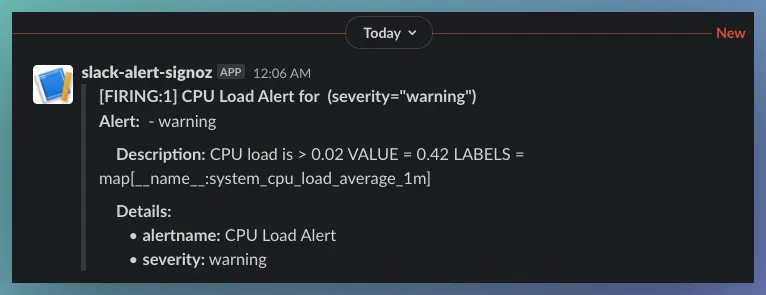
Receive Alert in Slack
Once everything is set up correctly, you should see your alerts in the configured slack channel whenever the monitored metrics cross the threshold specified in the alert rules.
Now you can stay relaxed that SigNoz will promptly alert you whenever something goes wrong in any of your applications or infra components.
Configure Webhook Channel
Prerequisite
You must have a valid webhook URL (reachable from SigNoz Alert Manager) and an application ready to accept webhook messages.
Creating a new Webhook channel
Enter Webhook URL endpoint, username and password (if needed). Use Test button to test the connection with your application.

Editing a Webhook channel
Similar to slack, you can edit most of the webhook parameters except the channel name and type.

Receive Alert through Webhook

Sample format of a Webhook message
A webhook message may contain multiple alerts. By default, the SigNoz alert manager groups alerts by the alert name and delivers the grouped messages every 5 minutes.
For resolved alerts, the alert manager will send the time of resolution in endsAt. You can also use fingerprint property to identify and process updates sent by alert manager.
{
   "receiver":"w1",
   "status":"firing",
   "alerts":[
      {
         "status":"firing",
         "labels":{
            "alertname":"DiskRunningFull",
            "dev":"sda3",
            "instance":"example3",
            "severity":"critical"
         },
         "annotations":{
            "info":"The disk sda3 is running full",
            "summary":"please check the instance example1"
         },
         "startsAt":"2022-04-25T14:35:19.490146+05:30",
         "endsAt":"0001-01-01T00:00:00Z",
         "generatorURL":"",
         "fingerprint":"ad592b0afcbe2e79"
      }
   ],
   "groupLabels":{
      "alertname":"DiskRunningFull"
   },
   "commonLabels":{
      "alertname":"DiskRunningFull",
      "dev":"sda3",
      "instance":"example3",
      "severity":"critical"
   },
   "commonAnnotations":{
      "info":"The disk sda3 is running full",
      "summary":"please check the instance example1"
   },
   "externalURL":"http://Apples-MacBook-Pro-3.local:9093",
   "version":"4",
   "groupKey":"{}/{}:{alertname=\"DiskRunningFull\"}",
   "truncatedAlerts":0
}
Configure Pagerduty Channel
There are two ways to integrate with Pagerduty: via global event orchestration or directly through an integration on pagerduty service. Integrating alerts with global event orchestration is beneficial if you want to automate incident creation or management.
Get Integration or Routing key to integrate with event orchestration
- From the Automation menu, select Event Orchestration
- Create a new orchestration
- Click on Global Orchestration Key, copy your integration key and keep it safe for later use.

Get Integration or Routing key to integrate with pagerduty service
- Go to Services > Service Directory and select the service where you’d like to add the integration.
- Select Integration tab and click Add another integration
- Select Events API V2 from the list
- Click Add
- Find your integration in the list and click down arrow to view and copy integration key (aka routing key)
For more details on pagerduty service setup, visit here.

Prerequisite
You must have a valid Integration Key (aka Routing Key) before you setup a pagerduty channel in SigNoz Dashboard.
Create a new Pagerduty channel
- Go to Settings > Alert Channels
- Click New Channel
- Enter a name and select Pagerduty as channel type
- Enter Routing Key (aka Integration Key) obtained from pagerduty (described at the start of this section)
- Enter more information as necessary. More details on the fields can be found here. You may also use go templates for dynamically setting the fields.
- Test the connect with Test button
- Save the channel

note
If you encounter any unexpected challenges during the use of this integration, please contact SigNoz Support at support@signoz.io
Demo video
Whew! That was a lot of instruction to follow. If you instead prefer to see how it works in a demo environment, here you go 👇